Wednesday 30 January 2013

Black and White Challenge - Day 5: Color base with something black


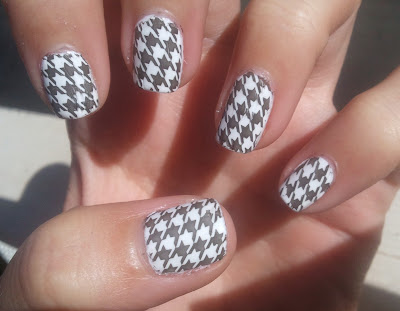
This is a design that I wanted to do forever! This pattern is actually the reason that I bought the DRK-A plate for the first place. I just love & adore cats! I have 2 kittens myself. 
So back to the design - this is a design that I've seen somewhere before, and wanted to recreate it since. I used E-England - Iseult as a base. The beauty of this polish did not transfer though these pictures. And again, used the DRK-A plate with Moyou black stamping polish. Hope you liked it! 

זה עיצוב שרציתי לעשות כבר כל כך הרבה זמן, ולמען האמת זוהי הסיבה שמלחתכילה רכשתי את דיסקית DRK-A. אני חולה על חתולים! יש לי חתולה הרבה שנים אצל ההורים, ו2 גורים שאימצנו לא מזמן. 
ובחזרה לציפורניים - ראיתי את העיצוב הזה בעבר בפינטרסט, ורציתי לשחזר אותו. 
אז השתמשתי בלק של איי אינגלנד - Iseult. היופי של הלק הזה לצערי לא עבר דרך התמונות. ושוב, כרגיל, השתמשתי בדיסקית DRK-A עם לק שחור להחתמות של Moyou. מקווה שאהבתן :) 


Sunday 27 January 2013

Black and White Challenge - Day 4: White base with some color


Millani hot pink DRK-A Black and White Challenge day 4


So... day 4! I must admit this was my least favorite day so far, I had a lot of trouble deciding what to do. I had few ideas, thought of maybe stamping with gold\copper, but in the end chose this pink over white design, especially because of this Millani glitter that I wanted to try out.

On all of the fingers except the ring finger, over 2 coats of "life" white nail polish (local brand) I stamped with Zoya - Lara the flower pattern, using DRK-A stamping plate. I added the pink dots inside the flowers using Orly - Miss Conduct. I think this design looks like a napkin, or a table cloth ^_^.

And... the ring finger. Here I used Millani Hot Pink. Eventually I think I used to much glitter here, but I must say I had a little trouble getting a lot of glitters on. I had to try a few times until it was something reasonable  and once I saw I had to much, I didn't have the energy to start this process all over again. It wasn't the greatest nail polish to work with. Maybe if they's put in more glitters it would work better.

אז... יום רביעי!! אני מודה שהיום הזה הוא היום שהכי פחות אהבתי עד כה, והתקשתי להחליט איזה עיצוב אעשה. היו לי כמה רעיונות אולי להחתים בזהב או בנחושת, אבל לבסוף החלטתי ללכת על העיצוב הורדרד הזה, בעיקר בגלל שרציתי לנסות את הגליטר של מילאני שקיבלתי השבוע :) 

על כל האצבעות מלבד הקמיצה מרחתי שתי שכבות של לק לבן של לייף, והחתמתי עם ZOYA - LARA את דוגמת הפרחים, מתוך דיסקית DRK-A. הוספתי את הנקודות הורודת הקטנות במרכז הפרחים עם Orly - Miss Conduct. לבסוף זה נראה שעיצבתי מפית לשולחן של פסח! או אפילו מפת שולחן! :). 

ובקמיצה... כאן מעל הלק הלבן מרחתי את Millani - Hot pink. בסופו של דבר נראה לי שמרחתי יותר מדי וזה נראה טיפה עמוס, אבל התקשתי מאוד לדוג את הגליטרים החוצה. ניסיתי מספר פעמים עד שהצלתי להוציא כמות סבירה, וכשראיתי שכנראה מרחתי יותר מדי, כבר לא היה לי כוח להתחיל את כל התהליך מההתחלה. זה לא היה הלק הכי נוח לעבוד איתו... ייתכן שאם היו שמים עוד מהגליטרים עצמם בלק היה יותר פשוט להוציא איתם, יותר מדי נוזל, מעט מדי גליטר. מקווה שנהנתן לקרוא! :) 


Millani hot pink DRK-A Black and White Challenge day 4

Millani hot pink DRK-A Black and White Challenge day 4

Friday 25 January 2013

Black and White Challenge - Day 3: Black base with some color

This is a pretty simple design, but beautiful as it is simple. Over one coat of a simple black base, I applies two coats of Revlon Scandalous. I've had this polish for a while now and it is the first time I used it, I absolutely love it! I got a lot of compliments on this one. In the sun It looks beautiful. 

ליום השלישי של האתגר - בסיס שחיר עם צבע כלשהו מעל - הלכתי על עיצוב פשוט. אבל מהמחמאות שהלק הזה גרף, עד כמה שהוא פשוט כך הוא יפיפה! על שכבה אחת של לק שחור של WOW, מרחתי שתי שכבות של Revlon Scandalous. יש לי את הלק הזה זמן מה, וזה פעם ראשונה שאני שמה אותו והוא פשוט מקסים במיוחד בשמש כפי שאתן רואות בתמונה. 

Revlon Scandalous 761

Revlon Scandalous 761

Black and White Challenge - Day 2: White on Black

So... day 2 of the challenge! I decided to go with this black holo by A-England - Black Veil, and stamp this butterfly wing pattern using NC01 plate! I think the result is cute, though alot of  people didn't recognize at all that this is a butterfly wing, maybe because of the colors. any way, hope you liked it!

אז ליום השני של אתגר השחור לבן בחרתי בשחור ההולוגרפי של A-England העונה לשם Black veil, צבע מאוד עדין בעיני. החתמתי מעליו בלבן את דוגמת כנף הפרפר מדיסקית NC01 של NailzCraze. והנקודות הן גם עם אותו השחור. אני חושבת שהתוצאה הייתה חמודה, אבל מוכרחה להודות שהרבה בנות לא הבינו שמדובר בכנף של פרפר, מישהי אמרה לי שזה נראה כמו שיש שבור... O_o. כנראה שצריך לעשות את העיצוב הזה בצבעים קצת יותר קונבנציונליים על מנת שאנשים יבינו :). חח. בכל אופן מקווה שאהבתן את התוצאה!

A-England - Black Veil butterfly stamp

A-England - Black Veil butterfly stamp


A-England - Black Veil butterfly stamp

A-England - Black Veil butterfly stamp

Friday 18 January 2013

Black and White Challenge - Day 1: Black on White

So, I decided to start my first challenge! I decided to do the black & white challenge because it is relatively short and seemed like a good challenge to start with.

black and white challenge day 1

black and white challenge day 1

black and white challenge day 1

black and white challenge day 1


Well I don't have a lot to say about this first design, I used a simple white polish by "life", which is a local Israeli company. For stamping I used "Moyou" stamping black polish using DRK-A plate.

Thanks for reading! soon day 2!


Wednesday 16 January 2013

Nail Design with NailzCraze Plates!

This is a design I did with NailzCraze stamping plates! I love Natalie and her designs, and the second I read about the contest I already started thinking about designs! ^_^
So you can see here on the paper I really tried to think how this will come out. Again, these are only my first attempts with sponging but I think I'm getting better :)

זהו עיצוב שעשיתי לתחרות החתמות עם דיסקיות NailzCraze! אני מאוד אוהבת את נטלי והעיצובים שלה, ולכן ברגע שקראתי על התחרות, כבר התחלתי לחשוב על רעיונות. 
תוכלו לראות בתמונה הראשונה שניסיתי לראות כאן על הנייר איך העיצוב הזה יצא. ושוב, אלו הם הנסינות הראשונים שלי בעיצובי גרדיאנט, אבל אני משתפרת לאט ובטוח :). 


So here you can see these three nail polishes by KIKO, used to create the gradient "dirty pink" as I like to call it, and I used NC01 & NC03 for the heart stamping. I applies one layer of "Poshe" top coat in the end.

Hope you liked this design! If so I'd love for you to vote for me via Natalie's blog :)

השתמשתי בשלושה לקים של קיקו על מנת ליצור את הגרדיאנט, שלושתם על אותו סוג גוון של ורוד עתיק שכזה. השתמשתי בדיסקיות NC01 ו- NC03 בשביל להחתים את הלבבות (שהיו נראים טוב יותר על ציפורניים ארוכות יותר. ושמתי שכבה של המייבש של פושה. 

מקווה שאהבתן את העיצוב! במידה וכן, אשמח אם תצביעו לי בתחרות בבלוג של נטלי! :) 
Monday 14 January 2013

Grey Gradient with Snow Flakes Stamping

Today I have for you this Gradient Design which I love! I love gradient and trying to practice it as often as possible. So I decided to do this kind of "wintery" look using 2 shades of grey! (LOL).
First I applied two coats of KIKO 328, and sponging it with the darker grey KIKO 381.
then I applied Poshe top coat for a smoother look, but I think I waited few seconds more than I should have.
Than used bundle moster stamping plate BM-323, with Moyou white stamping nail polish, and another top coat. 

KIKO 328  KIKO 381 gradient nail art

KIKO 328  KIKO 381 gradient nail art

KIKO 328  KIKO 381 gradient nail art

KIKO 328  KIKO 381 gradient nail art


Thant's it! have a great weak everyone! 

Friday 11 January 2013

NOTD with Essie Miss Fancy Pants

Essie Miss Fancy Pants

Essie Miss Fancy Pants

Essie Miss Fancy Pants

Essie Miss Fancy Pants

Today I have for you nail design with Essie Miss Fancy Pants. I Allready posted about one of Essie's polishes from the Stylenomics collection, and today you'll see two more!
I used Essie Miss Fancy Pants on all fingers but the ring finger, I used Essie Don't Sweater It, also from Stylenomics collection. I really like these shades! But I needed to top it with something more interesting, so I stamped with MoYou white nail polish for stamping with a design from DRK-A plate.
Thanks for reading!

אז היום אראה לכן עיצוב עם אסי Miss Fancy Pants, גם מקולקציית סטיילנומיקס, שכבר כתבתי על לק אחד מתוכה. אז היום תראו עוד שניים! אז השתמשתי בלק המדובר בכל האצבעות חוץ מהקמיצה, שם מרחתי את אסי Don't Sweater It, גם מאותה הקולקציה. על מנת להפוך את העיצוב למעט יותר מעניין, החתמתי עם הלק הלבן של Moyou דוגמא מדיסקית DRK-A שאני כל כך אוהבת להשתמש בה לאחרונה. 
מקווה שאהבתן את העיצוב! שיהיה לכולן סופש חמים ונעים! 

Burt's Bees Lemon Butter Cuticle Cream

I ordered this cream from eChemist.co.uk after I heard a lot about from a few friends and bloggers.
I've been using it for the past week, and I could really see the difference. My cuticles are so soft now, they used to be really dry. It looks better for the average eye, but this could also be solved with a regular hand cream. This butter really helps for the close up macro images for the blog, and it is quite noticeable.

The lemony smell is amazing! And it was so helpful, that when I put it on before I go to bed, I also put some on my boyfriend LOL, his hands are so dry especially the fingers! I need to order more soon.. when we both use it I this it'll be gone in a few weeks... So all an all, I don't have much to say that wasn't written already, but I love this product and join all of those who recommended it before me.

הזמנתי את החמאת קיוטיקלס הזאת מהאתר eChemist.co.uk אחרי ששמעתי עליה מחברות ובלוגריות ברחבי הרשת. אני משתמשת בו בשבוע האחרון, והשינוי ניכר. הקיוטיקלס שלי עכשיו הרבה יותר רכים ופחות יבשים. ביום יום זה לא משהו שמבחינים בו כל כך בקלות, ובמידה ושמים קרם ידיים באופן סדיר הידיים נראות סבבה. הבעיה היא בצילומי מאקרו לבלוגהשרואים את האצבעות ממש מקרוב, מבחינים בכל פגם קטן! 

הריח הלימוני הוא נהדר ומרענן! הקרם הזה כל כך מצא חן בעיני, שהייתי חייבת לשים אותו גם האצבעות של חבר שלי, שהן ממש יבשות כי הוא כוסס אותן והן נראות נורא! חח. נראה לי שבקצב הזה הקרם ייגמר ממש בקרוב ונזצטרך להזמין עוד אחד כבר בשבועות הקרובים. אז, אין לי עוד מה לחדש בנוגע לקרם הזה מעבר למה שכבר נכתב בעבר. אז אני אצטרף לכל מי שהמליצה עליו בעבר ועודד אותכן לבזבז עוד - מוצר חובה! :) 

בקשר להזמנה - המוצר עולה באתר 6 פאונד, אבל פעמים רבות יש ב - eChemist הנחות של 20%. אני קניתי בהנחה, הם מורידים את המס והמשלוח חינם, אז סכ"ה זה יוצא 25 שקלים פחות או יותר, וזה המחיר הכי טוב שראיתי כרגע למוצר זה. 

Burt's Bees Lemon Butter Cuticle Cream

Burt's Bees Lemon Butter Cuticle Cream


Essie Recessionista

Essie Recessionista

Essie Recessionista

Essie Recessionista

Essie Recessionista

Essie Recessionista

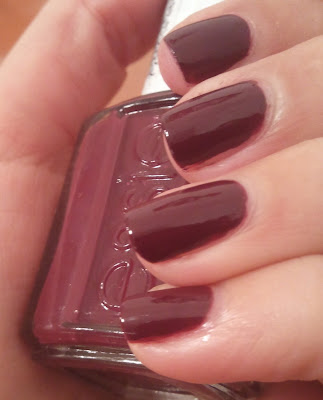
At the begining of this week I recieved in the mail Essie Stylenomics collection! I was so happy that it arrived, I had to try it on. So this is the first color that I tried from this collection, Recessionista. on Essie's website it is decribed as "a smart, intelligent and savvy brick red". I really like this color, good shade for winter.
I tried stamping on it first, but it didn't come through so well, so I decided to keep it simple with just one little flower in my ring finger, stamped with Accessorize Greige again.
Hope you liked this design! :)

בתחילת השבוע קיבלתי בדואר את קולקציית Stylenomics של אסי! הזמנתי אותה דרך המצבע של גרופון באסי ב-169 ש"ח. זה יוצא 30 ומשהו ש"ח ללק במקום 50, שזה מחיר טוב לדעתי, ולא התאפקתי ורכשתי את הקולקציה! הייתי חייבת לנסות את הלקים, והראשון שנבחר הוא Recessionista. אדום חציל שכזה, שמזכיר לבנים אדומות. הגוון הזה אהוב עלי במיוחד, ומתאים לחורף בעיני. 
בהתחלה ניסיתי להחתים עליו עם בורדו, אבל זה לא יצא כל כך טוב, אז השארתי את העיצוב פשוט עם פרח אחד על הקמיצה, שהחתמתי שוב עם הלק של אקססורייז מהפוסט הקודם. 
מקווה שאהבתן את העיצוב :) 

Tuesday 8 January 2013

Stamping with Accessorize Greige

Accessorize Greige careline 385

Accessorize Greige careline 385

Accessorize Greige careline 385

Accessorize Greige careline 385

Accessorize Greige careline 385

For this design I used "Careline" 385 as a base, which is a nude pink. I love these kind of shades, I can never get enough of them :) For the stamping I used DRK-A plate. 
Now the color I used for the stamping is Accessorize Greige, that I brought with me from England. We have "Accessorize" shops in Israel but unfortunately they do not sell nail polish. I used it for this design for the first time and for stamping it is perfect! Very thick just as you would want. Highly recommended! 
Hope you like this design! Have a great evening! 

לעיצוב הזה השתשתי בקרליין מס' 385, ניודי ורוד עתיק כזה, בגוון שאני מאוד אוהבת. בכלל אני חובבת גוונים ניודים, ואני תמיד אשמח להוסיף עוד לאוסף :). הדיסקית שהשתמשתי בה היא DRK-A.
והמטרה שלשמה התכנסנו, הלק שבו השתמשתי להחתמות הוא Greige של חברת Accessorize, שהבאתי איתי מהטיול האחרון באנגליה. למרות שיש לרשת זו חנויות בארץ הם לא מוכרים לקים וחבל מאוד שכך. 
הלק פשוט מעולה להחתמה, הוא מאוד סמיך ומתאים! השתמשתי בו היום לראשונה מאז שקניתי אותו והתרשמתי לטובה! ממליצה למי שיוצא לה.. :) 
מקווה שנהנתן לקרוא! שיהיה לכולנו ערב שקט ורגוע! 

Saturday 5 January 2013

NOTD with PUPA Holographic Lilac


PUPA Holographic Lilac

PUPA Holographic Lilac

PUPA Holographic Lilac

PUPA Holographic Lilac

For this design I used Pupa Holographic Lilac, and for the stamping used BM-317.
I loved the color, and the delicate design that came out with it. In this picture I used only one coat! It is very opaque and It was nice for a change to put on only one coat :)
About durability, after only a day I started to see withdrawal of the polish on the tips.... usually holographic polishes are like that, so it wasn't at all surprising. 
Hope you liked it! Have a great day! 


בעיצוב הזה השתמשתי בפופה הולגרפי בגוון לילך, ובשביל ההחתמה בשתמשתי בדיסקית BM-317. 
אני מאוד אוהבת את הצבע, ואת היצוב העדין (וקצת קיצ'י P=) שייצא. בתמונה אתן רואות שכבה אחת בלבד! הוא היה אטום מאוד וזה היה מאוד מרענן לשים רק שכבה אחת לשם שינוי. 
באשר לעמידות, אחרי יום בלבד כבר הצלחתי לראות נסיגה בקצוות הלק וכל מיני קילופים קטנים, זה ככה בד"כ בלקים הולוגרפיים, כך שזה לא הפתיע אבל כרגע מבאס :\. 
וזהו ! מקווה שנהנתן לקרוא, אם כן אשמח אם תהפכו לעוקבות. 

LinkWithin

Related Posts Plugin for WordPress, Blogger...